Showing posts with label dessert. Show all posts

Saturday, March 26, 2011

Red Velvet Cupcakes

  • 24 paper liners for cupcake pans (2 1/2 –inch size)
  • 1 package (18.25 ounces) plain German chocolate cake mix
  • 1 package (3.4 ounces) vanilla instant pudding mix
  • 1 cup sour cream (see Note)
  • 1/2 cup water
  • 1/2 cup vegetable oil
  • 1 bottle (1 ounce) red food coloring
  • 3 large eggs
  • 1 cup miniature semisweet chocolate chips

  1. Place a rack in the center of the oven and preheat the oven to 350° F. Line 24 cupcake cups with paper liners. Set the pans aside.

  2. Place the cake mix, pudding mix, sour cream, water, oil, food coloring, and eggs in a large mixing bowl. Blend with an electric mixer on low speed for 30 seconds. Stop the machine and scrape down the sides of the bowl with a rubber spatula. Increase the mixer speed to medium and beat 2 minutes more, scraping down the sides again if needed. The batter should look thick and well combined. Fold in the chocolate chips. Spoon or scoop 1/3 cup batter into each lined cupcake cup, filling it three quarters of the way full. (You will get between 22 and 24 cupcakes; remove the empty liners, if any.) Place the pans in the oven.

  3. Bake the cupcakes until they spring back when lightly pressed with your finger, 18 to 20 minutes. Remove the pans from the oven and place them on wire racks to cool for 5 minutes. Run a dinner knife around the edges of the cupcake liners, lift the cupcakes up from the bottoms of the cups using the end of the knife, and pick them out of the cups carefully with your fingertips. Place them on a wire rack to cool for 15 minutes before frosting.
From whence it came:  My sister-in-law, Geralene, told me about a woman named The Cake Doctor.  Have you ever heard of her?  I hadn't either, but she has the coolest name ever.  I want her name.  I want to be called the cake doctor.  It's so much cooler than just being called Pam.  Anywho, The Cake Doctor takes regular old cake mixes and doctors them up.  She turns regular into really really yum-e!  Geralene made this recipe into a cake, and it was fabulous.  I've made it into a cake and into cupcakes, and both were divine!  When I made the cake I baked it in a 9"x13" pan at 325 degrees for about 50 minutes. 

Why it's blogable:  I served this cake to company and the little six year old girl who was visiting ate three pieces!  Three!  She is a little tiny girl and she ate three pieces!  And took another one home!  That just shows you how good this recipe is, and how much you need to try it!  Also, when The Spy Who Love Me saw that I was making Red Velvet Cake he kind of made a scrunched up face.  That's one way The Spy lets me know he's not thrilled.  He has other ways, but that's just one way.  Well, The Spy had to swallow his pride and beg for my forgiveness once he tasted this cake.  He was instantly sold, and you will be, too!

I frosted the cake and cupcakes with this heavenly frosting:
That's the Best Frosting I've Ever Had
I can't say enough about this frosting on top of this cake and cupcakes.  I can't say enough about this frosting.  Period!

I like to serve this cake and frosting refrigerated, but it's really good at room temp, too.

Click here to get the printables:
Red Velvet Cupcakes
That's the Best Frosting I've Ever Had

Hope you enjoy stirring it up!

Tuesday, January 25, 2011

Low Fat Carrot Cake


Cake:
9 Tbsp butter, softened
2/3 C. packed brown sugar
1/2 C. sugar
2 large eggs
2 large egg whites
2 tsp vanilla
2 C. flour
2 tsp baking soda
1 tsp cinnamon
1/4 tsp salt
3/4 C. low-fat buttermilk
2 C. finely shredded carrots   

Frosting:
4 ounces block-style fat free cream cheese*
1/4 C. butter, softened
2 tsp vanilla
1/8 tsp salt
2 3/4 C powdered sugar, divided
Orange sugar sprinkles (or whatever you have around)

Preheat oven to 350 degrees.**

To prepare cake, coat a 13x9 inch baking pan with cooking spray; line bottom of pan with wax paper.  Coat wax paper with cooking spray; set aside.

Place 9 Tbsp butter, brown sugar and granulated sugar in a large bowl; beat with mixer at medium speed 5 minutes or until well blended.  Add eggs and egg whites, 1 at a time; beating well after each addition until pale and fluffy.  Beat in 2 tsp of vanilla.

Lightly spoon flour into dry measuring cups; level with knife.  Combine flour, baking soda, cinnamon, and 1/4 tsp salt, stirring with a whisk.  Add flour mixture and buttermilk alternately to sugar mixture, beginning and ending with flour mixture; mix after each addition.  Stir in carrot.  Spoon batter into prepared pan.  Sharply tap pan once on counter to remove air bubbles.  Bake at 350 degrees** for 30 minutes or until a wooden pick inserted in center comes out clean.  Cool in pan 10 minutes on a wire rack; remove from pan.  Carefully peel off wax paper; cool completely on wire rack.

To prepare frosting, place the cream cheese, 1/4 C butter, 2 tsp of vanilla and 1/8 tsp salt in a large bowl; beat with a mixer at medium speed until smooth.  Gradually add 2 cups powdered sugar, beating at low speed until smooth (do not overbeat).  Stir in the remaining 3/4 c. powdered sugar.  Cover and chill 30 minutes.  Spread frosting over top of cake.  Garnish with  sprinkles.  Store cake loosely covered in refrigerator. 
Yield:  16 servings

Calories:  309; Fat 10.3 g; Protein 4.5g; Carb 50.2 g; Fiber 0.9g

*I have never been able to find Fat free cream cheese so I always use the 1/3 less fat ones.

**The recipe calls for the oven to be at 350 degrees, but I bake it at 300 degrees for one hour or until done.


From whence it came:  Starts with "K", ends with "erinda".  That's right, my great friend, Kerinda gets another gold star for sharing another golden recipe.  (Knowing her like I do, she's not gonna want a gold star.  She's gonna want chocolate.  She and I share a love of all things chocolate.  But all she's getting is a gold star.  And a great big thank you!)

Why it's blogable:  To be totally honest, which I always am, except when it comes to listing my weight on my driver's license, I think this carrot cake recipe is better, but it's also a lot more fattening.  So, this one is blogable because it's a lot less fattening, and still really yum-e.  No one will know it's low fat unless you tell them.  And you really shouldn't tell them, at least not until they tell you they love it, and they will.

Give it a try. 
Take it for a test drive. 
Give it a whirl. 
Take it out for a spin. 

Click here to get the printable:
Low Fat Carrot Cake

Hope you enjoy stirring it up!

Friday, December 17, 2010

Aztec Dessert

1 package Oreo cookies
1 stick melted butter
1/2 gallon ice cream, any flavor
Hot fudge sauce
1 8 oz. Cool Whip

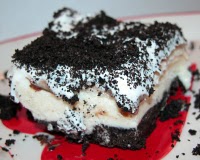
Crush Oreos in large zip lock bag.  Reserve 1 cup and add melted butter to remaining Oreos.  Press into bottom of 9x13 pan.  Freeze for about 20 minutes.

Top Oreo crust with ice cream.  I normally remove ice cream from carton and slice with a big knife, then place it onto the crust.  You can also soften the ice cream and spread it over the crust.

Top with hot fudge sauce that has been cooled to room temperature, then spread Cool Whip on top.  Sprinkle remaining Oreos on Cool Whip.  Place in freezer for at least one hour.  Cut into squares and serve.

From whence it came:  We all need to bow down and kiss the feet of my sweet sister-in-law, Geralane, and thank her for this over-the-top, to-die-for recipe!  She has given me many great recipes over the years, but this one stands alone.  It's amazing, just like Geralane!

Why it's blogable:  A few reasons:  Oreos, butter, ice cream, Cool Whip and hot fudge!  Can you think of a better combo?  I didn't think so.  This recipe is a hit 100% of the time.  Everyone loves it, and it's very easy to make.  It's perfect for the holidays.  If you make it with peppermint ice cream it is wonderful, and so so pretty.  The Spy Who Loves Me has over the years requested it for his birthday cake.  It's great with Mocha Almond Fudge ice cream, or cookies and cream, or mint chip, or really any flavor you like.  You can't go wrong with this recipe, unless you decide not to make it.  That would be wrong.  Very wrong!

If you want to simplify the recipe, you can buy hot fudge sauce rather than make your own.  The original recipe calls for store bought sauce.  And it's good that way, but it's better with this sauce.  And cheaper, too.  Either way, you're gonna love this recipe!

Click here to get the printable:
Aztec Dessert

Hope you enjoy stirring it up!

Thursday, December 2, 2010

Gooey Toffee Butter Cake


Cake:
1 (18.25-ounce) box yellow cake mix
1 large egg
1/2 cup (1 stick) unsalted butter, melted
 
Filling:
1 (8-ounce) package cream cheese, softened
2 large eggs
1 teaspoon pure vanilla extract
1 (16-ounce) box confectioners' sugar
1/2 cup (1 stick) unsalted butter, melted
1 cup almond toffee bits or chocolate toffee bits
 
Preheat the oven to 350 degrees F. Lightly grease a 13 by 9 by-2-inch baking pan.
 
For the cake: In the bowl of an electric mixer, combine the cake mix, egg, and butter and mix well. Pat into the bottom of prepared pan and set aside.
 
For the filling: Still using an electric mixer, beat the cream cheese until smooth. Beat in the eggs and vanilla. Dump in confectioners' sugar and beat well. Reduce the speed and slowly pour in butter. Mix well. Fold in toffee bits.
 
Pour filling onto cake mixture and spread evenly. Bake for 40 to 50 minutes. Don't be afraid to make a judgment call on the cooking time, because oven temperatures can vary. You want the center to be a little gooey, so don't bake it past that point!
 
Remove from oven and allow to cool completely. Cut into squares. Just remember that these wonderful cakes are very, very rich, and a little will go a long way.

From whence it came:  The queen of ooey-gooey treats, Paula Deen!   I don't know how she does it, but Paula just keeps cranking out fabulous recipes.  I think her secret is BUTTER!  You just can't go wrong with butter.  

Why it's blogable:  This recipe is very similar to the Gooey Pumpkin Butter Cake recipe that I posted a while back.  I had so much great feedback on the Gooey Pumpkin recipe that I just had to post the Gooey Toffee recipe.  They are both delicious, and this one is perfect for the holidays.

You don't have to add the toffee pieces if you don't want to.  You can just make a Gooey Butter Cake.  I've done it both ways, and both were yum-e!

Click here to get the printable:

Hope you enjoy stirring it up!

Monday, October 25, 2010

Pumpkin Gooey Butter Cakes


Cake:

  • 1 (18 1/4-ounce) package yellow cake mix
  • 1 egg
  • 8 tablespoons butter, melted

Filling:

Directions

Preheat oven to 350 degrees F. 

Combine the cake mix, egg, and butter and mix well with an electric mixer. Pat the mixture into the bottom of a lightly greased 13 by 9-inch baking pan. 

To make the filling: In a large bowl, beat the cream cheese and pumpkin until smooth. Add the eggs, vanilla, and butter, and beat together. Next, add the powdered sugar, cinnamon, nutmeg, and mix well. Spread pumpkin mixture over cake batter and bake for 40 to 50 minutes. Make sure not to overbake as the center should be a little gooey.  Serve with fresh whipped cream

From whence it came:  The queen of butter herself, Paula Deen!  How can you not love Paula!  She is so much fun, not to mention the fact that her recipes are amazing!  And this one is no exception!
Why it's blogable:  Any recipe with the words "gooey" and "butter" in the title has a good chance of being blogable.  I'm personally not a fan of pumpkin pie, but I do love this recipe.  It's perfect for parties or for a holiday meal.

Click here to get the printable:

Hope you enjoy stirring it up!

Thursday, October 14, 2010

Apple Crisp

6 large Granny Smith apples, peeled, cored and sliced
1 t. cinnamon
1/2 c. sugar

Mix the cinnamon and sugar, then pour over the apple slices and stir well. They will look like this:

Pour apples into greased 9x13" pan.

Topping:
1/2 c. brown sugar
1/2 c. white sugar
1/2 c. softened butter
1 c. flour

Mix all ingredients with a pastry cutter or fork until mixtures is crumbly and butter is pretty well combined.  Sprinkle over apples.  Bake in preheated 350 degree oven for 40-50 minutes.

Serve warm with whipping cream or vanilla ice cream.

(If you're in the mood to be naughty, double the crumb topping!  It will make the crust really thick, and let's be honest, that's the best part!  I'm in the mood to be naughty almost every time I make this recipe.  Actually, I'm in the mood to be naughty pretty much all the time!  Oh, and if you're in a nutty mood, add chopped walnuts or pecans to the topping!)

From whence it came:  Another shout out to my wonderful cook of a sister-in-law, Geralene!  She gave me this recipe a long time ago, and it's a doozy!

Why it's blogable:  Because apples are healthy!  They have a lot of fiber and tons of vitamins.  You've heard it, and I know it's true, an apple a day keeps the doctor away!  So what if they weren't referring to apples covered in butter and sugar.  They're still apples!  You can put this recipe right in the fruit and vegetable food group.  I said so!

Here's the printable:
Apple Crisp

Hope you enjoy stirring it up!

Tuesday, September 21, 2010

Easy Caramel Pecan Brownies

1  pkg.  (19 to 21 oz.)  brownie mix (13x9-inch pan size)
1 pkg. (11 oz.) KRAFT Caramel Bits
1/3 cup whipping cream
2 cups pecan Halves, divided

PREHEAT oven to 350°F. Line 13x9-inch baking pan with foil, with ends of foil extending over sides of pan. Generously grease foil. Prepare brownie batter as directed on package; spread half of the batter into prepared pan. Cover remaining batter; set aside.

BAKE 20 min. or until top is firm to the touch. Meanwhile, microwave caramel bits and whipping cream in medium microwaveable bowl on HIGH 2 min., stirring every 30 sec. or until caramel bits begin to melt; stir until completely melted. Add 1 cup of the pecans; mix well. Spread over partially baked brownie; top with remaining brownie batter. (Some caramel may peek through batter.) Sprinkle with remaining pecans.

BAKE an additional 25 min. or until top is firm to the touch. Cool completely. Use foil handles to lift dessert from pan before cutting to serve. Store in covered container at room temperature.

From whence it came:  I found this divine recipe on the back of the Kraft Caramel Bits package.  I thought it looked yum-e, and I was right!  I bought the Caramel Bits at Super Walmart.  You can probably find them wherever you shop.
Why it's blogable:  If you're into chocolate mixed with nuts and ooey, gooey caramel, I don't need to tell you why it's blogable.  Is there a better combination than chocolate, caramel and nuts?  I think not!  These very easy to make, and my family went nuts for them.  Get it?  Nuts for them!  They have nuts!  Get it?  The Spy Who Loves me was especially head over heals for these brownies.  Oh, and did I mention the edges?  The edges are kinda crispy and gooey all at the same time.  The edges have got it goin' on!  This recipe is similar to this recipe, but different enough that they both deserve a place of honor on my little blog.

You can print it here if you want to!

Hope you enjoy stirring it up!

Monday, July 12, 2010

The Best Carrot Cake Recipe of All Time

2 1/2 c. flour
1 c. white sugar
1 c. brown sugar
1 t. baking soda
1 t. salt
2 t. cinnamon
2 c. grated carrots
1 c. chopped walnuts
1 c. vegetable oil
1 t. vanilla
1 small can crushed pineapple, juice and all
3 eggs

Place dry ingredients in large bowl, mix with wire wisk.  Add other ingredients and mix well.

Bake in greased and floured 9x13 pan at 325 degrees for 1 hour.

Cream Cheese Frosting
1 cube softened butter
1 8 oz. block cream cheese, softened
2 t. vanilla
1 box powdered sugar
Cream butter, cream cheese and vanilla.  Add powdered sugar and mix until combined and smooth.  Spread over cooled cake.

From whence it came:  This recipe was published in a church bulletin by a great gal named Debbie Askar.  I haven't seen Debbie for many years, but I feel so blessed to know her and her fabulous family.  She is a great person, and so sweet to share this amazing recipe with all of us!

Why it's blogable:  Because it's the best carrot cake I have ever eaten! I am a fan of carrot cake, and by far, this one takes the number one slot.  It has a dense consistency and it's so moist.  And as if that wasn't enough, you top it with this cream cheese frosting recipe and your taste buds will scream with delight.  When my daughter was married almost a year ago I made four different flavors of cake, and this was one of them.  And it was a hit!  Try it if you're in the mood to hit a dessert home run!

Click here to get the printable:
http://www.scribd.com/doc/34185374/Carrot-Cake

Hope you enjoy stirring it up!

Monday, May 31, 2010

Snickerdoodles


Cream:
1 c. butter
1 ½ c. white sugar

Add:
2 eggs (one at a time) beat until creamy

Mix in:
2 ¾ c. flour
1 t. baking soda
2 t. cream of tarter
½ t. salt

Mix well. Roll into balls (walnut size). Roll balls into mixture of 2 T. sugar and 1 t. cinnamon. Bake at 400 degrees for 10 minutes.
When I make these I use a ¼ cup measuring cup. Walnut size…yeah right! You may need to cook them a bit longer if you make them big.

From whence it came: This is such a cool story. My dad's cousin, Suzie, mailed this recipe to me out of the blue. We really never correspond and one day I opened my mail and there was this super cute recipe card with this super yum-e recipe on it. I wrote her a thank you note, but she deserves more than just a silly note. Thanks, Suzie! You're a very sweet second cousin!

Why it's blogable: I really never made Snickerdoodles until I received this recipe and now I make them quite often. They look really cool after you cook them and they are always a hit when I take them somewhere. Again, I realize this isn't the world's most original recipe, but it's really good!

Why the bow?: Sometimes I wrap these up in a celophane bag, tie a pretty bow on top and give them to someone that I love. These are going to a neighbor of mine. I think homemade baked goods make the best gifts! "Nothing says lovin' like something from the oven!"

Hope you enjoy stirring it up!

Thursday, May 6, 2010

Cookies and Cream Ice Cream

This is all you need...
1/2 gallon vanilla ice cream
1 8oz. container Cool Whip
1 package Oreo cookies

Put the cookies in a gallon zip lock baggie and break them into small but not too small pieces. I like to whack 'em with my rolling pin. Better than therapy, and cheaper, too! Let the ice cream soften a bit then gently stir in the cool whip and cookies. Put back in freezer for at least a couple of hours. That's it!

From whence it came: My sister-in-law, Lynn, used to make this recipe. I remember the first time she made it for us, I thought the Spy Who Loves Me was going to kiss his sister right on the lips. Creepy! He stopped short of that, but he is a BIG fan of this ice cream!

Why it's blogable: Three ingredients, a bowl and a wooden spoon and when you're done you have a sweet treat that will help you win friends and influence people. This recipe is just about as easy as they come, and it's super duper yum-e!

I have a bone to pick:

Dear Ice Cream Manufacturers,

We are not idiots! We can see that you have reduced the size of your cartons and raised your prices. You are annoying and rude and if we weren't totally and completely addicted to ice cream we would boycott your product and put you out of business! Lucky for you we can't live without ice cream, or you'd be toast!

Love,

A consumer who is NOT an idiot

Oh, that reminds me, now that the ice cream containers are smaller, you may not want to add all the Oreos. You can save out one sleeve and then stick an Oreo in each bowl when you serve it. It looks a little bit fancier that way, too!

Oh yeah, and one more thing...you can use other flavors of ice cream, too. Maybe mint or mocha. Live dangerously, try something crazy!

Hope you enjoy stirring it up!

Sunday, May 2, 2010

Strawberry Layered Dessert


Bottom layer:

Mix one white or yellow cake mix according to package directions. Divide mixture into two greased 9x13 pans. Bake 15-20 minutes at 350 degrees.

Middle layer:

Mix 8 oz. softened cream cheese and 2 c. powdered sugar until well blended. Fold in 12 oz. Cool Whip. Divide in half and spread over cooled cake layers.

Top layer:

Slice two baskets of strawberries and mix with one 13 oz. container of strawberry glaze. Spread over cream cheese layer. (You need two baskets of strawberries and 1 container of glaze for each pan.)

Chill for two hours then slice, serve and enjoy!

From whence it came: This great recipe is another one from my wonderful friend, JoDee Glazier. She's the one who shared that great tortilla soup recipe with us, too. And someday soon I will share JoDee's pasta salad recipe with you, and you will thank me (and JoDee) until the cows come home, because it's one of the best pasta salads I've ever ever had! JoDee, you are so nice to share your yum-e recipes. And you're so nice in every other way, too!

Why it's blogable: This recipe is just as pretty as it is delicious! It's very light and perfect for a springtime or summer dessert. I made 18...yep, 18...of these puppies this past weekend for a wedding. If you're thinking that's crazy, you're almost right. Actually, it wasn't all that bad. I made the cakes a couple of weekends ago and put them in the freezer. Then, on the morning of the wedding my amazing, fabulous, wonderful mom helped slice the 36...yep, 36...baskets of strawberries. It was worth the work, because they looked really pretty and tasted really good!

A HUMONGOUS shout out: Us Andersons have the world's most fabulous friends! In the friend department, we are abundantly blessed! There's a group of us who all pitch in and help each other through life's most wonderful moments, and sometimes during life's most difficult moments. Some of life's most wonderful moments are the weddings of our children. Last July my dessert eating daughter from San Diego married a meat eating boy from Chicago and the world's most fabulous friends all swooped in to help us pull of a fairytale day and night! I'll forever and ever be grateful to every single one of them. This past weekend we all gathered together to do the same for our beloved friends, the Halls, and it was so much fun. At one point of the evening I was helping out in the kitchen...shocker, I know, Pam in the kitchen...and I was looking at about a million 10 pound cans and one very small can opener. Well, maybe not quite a million, but at least five, and just one small can opener. Then, who do you think would appear? My new BFF, VJ Bitton. Yep, VJ Bitton is my new BFF. I said, "VJ, if you open these cans for me you will be my new BFF and I will tell the entire world about it on my blog." (That would only be true if the entire world read my blog, but in my mind and dreams the entire world does, so it's sort of true.)

Let me take a second to tell you about Grace and VJ Bitton. Who am I kidding, it would take hours to tell you about Grace and VJ Bitton. They are truly the best of the best! Grace worked her magic on the reception this past weekend, and the result...magical! VJ opened my cans, and did a boatload of other things to help make the night oh so memorable. Speaking of boats, last summer Grace and VJ took our family out in Oceanside Harbor on their super cool and super speedy boat and helped us create a fabulous memory.

I hope each of you find yourselves surrounded by friends such as these. I've said it before...friends, family and food! It just doesn't get any better than that!

Hope you enjoy stirring it up!

Thursday, April 22, 2010

Butterscotch Cookies

1 c. butter
1 ½ c. packed brown sugar
1 large egg
3 T. heavy whipping cream
1 t. vanilla
3 c. flour
1 t. baking soda
½ t. salt

Heat oven to 375 degrees.

Cream butter and sugar until smooth. Add the egg, cream and vanilla and blend. Add dry ingredients to creamed mixture.

Spoon onto ungreased cookie sheets and bake until cookies are golden and firm to the touch, about 12-14 minutes. (If you want to make them really big use a 1/4 cup measuring cup and then bake them a few minutes longer.)

From whence it came: Sue Burns, the friend who gave me the Chocolate Peanut Butter Cookie recipe, also gave me this one, and it's another winner! Thanks for giving me so many great recipes, Sue! You're a cooking and baking hero!

Why it's blogable: These cookies have a great flavor. If you feed one of these to The Spy Who Loves Me he will take one bite and his eyes will roll back into his balding head. Do you think it's mean that I said he's balding? Well, if it is then too bad! When I married the man twenty-eight years ago he had a full head of the thickest red curly hair you ever did see. Now don't get me wrong, I knew there was a chance that someday those red locks would turn white...and they have...but never in a million years did I dream that he would shave each and every one of them down to a fraction of an inch. I know this is a cooking blog, and not a tell the world what you just don't get about your husband blog, but I just don't get why he wants to look balder than he really is. It's not natural. Most men are clambering for more hair. They make infomercials about it. Heck, they even have a hair club for men. I know it's true, I've seen it on TV. Well, I've just gone way off topic, but I feel better now that I've vented a bit. It won't make a lick of difference, he's determined to go out of this world balder than when came into it. Anywho, these cookies are good! You should make them. I'm making a batch right this very minute for my sonny-in-law who I'm planning to visit this weekend. I love to cook for that boy. He's very appreciative and a whole lot of fun! You should make them for someone you love. Maybe even someone who's balding!

Hope you enjoy stirring it up!

Wednesday, April 21, 2010

Eclair Cake


Cake:
1 (1-pound) box graham crackers
2 (3 1/4-ounce) boxes instant French vanilla pudding
3 1/2 cups milk
1 (8-ounce) container frozen whipped topping, thawed

Frosting
1 1/2 cups confectioners' sugar
1/2 cup cocoa
3 tablespoons butter, softened
1/3 cup milk
2 teaspoons light corn syrup
2 teaspoons pure vanilla extract

Butter the bottom of a 13 by 9 by 2-inch pan. Line with whole graham crackers. In bowl of an electric mixer, mix pudding with milk; beat at medium speed for 2 minutes. Fold in whipped topping. Pour half the pudding mixture over graham crackers. Place another layer of whole graham crackers on top of pudding layer. Pour over remaining half of pudding mixture and cover with another layer of graham crackers.

For frosting, blend together sugar and cocoa. Add butter and milk, mixing well. Add corn syrup and vanilla. Stir until creamy. Cover cake with frosting and refrigerate for 24 hours.

From whence it came: This is one of Paula Deen's recipes, so you know it's good! The Spy Who Loves Me had this dessert somewhere and came home and raved about it so I Googled it and found a recipe for it on my friend Paula's web site. I love you, Paula Deen. Please invite me on your show. We'd have so much fun stirring it up together! And if you want to surprise me and have Tim McGraw come out while we're cooking, you'll make me the happiest girl in the whole wide world. Just give me a tiny bit of notice so I can lose about 40 pounds and get a face lift!

Why it's blogable: It's kind of different and out of the ordinary. I'd never heard of it before, and it's really good. It's easy to make and the teen son is a lover of it! One year he asked to have it as his birthday cake...at the beach...in the sand. We managed to keep the sand out of it and it was super good!

Hope you enjoy stirring it up!

Monday, April 19, 2010

Chocolate Peanut Butter Cookies

½ c. butter
½ c. chunky peanut butter
1 c. packed brown sugar
1 egg
1 t. vanilla extract
1 c. flour
¼ c. cocoa powder
½ t. baking soda
½ c. semisweet chocolate chips
½ c. chopped peanuts

Preheat oven to 350 degrees. Cream butter, peanut butter and brown sugar. Add egg and vanilla. Add dry ingredients; mix well. Stir in chocolate chips and nuts. Bake on ungreased cookie sheet for 12-14 minutes.

From whence it came: A really super duper amazingly great cook gave this recipe to me. The credit for this one goes to my friend Sue Burns. Sue and I were neighbors for many years before our family moved away. We shared a love of cooking, but I must admit, Sue is a much fancier cook than I am. No recipe is too difficult or too complicated for Sue, and the food she makes always looks as good as it tastes. Sue and I have shared many yum-e recipes, and this one is at the top of the list! Sue, thanks for all the great recipes, and for all the great memories, too!

Why it's blogable: These cookies are soft and really really good! You can make them big by using a quarter cup measuring cup, but if you do you will need to cook them a bit longer. Or you can just make them regular size and cook them as directed. It's kind of hard to tell when they're done because they are already brown so you can't wait until they've browned. I just touch them lightly on the side and if they seem set then they're done. They don't go flat like some cookie recipes and they are a hit whenever I make them. Oh, and like I've said before with many of my other recipes, I ALWAYS double the recipe!

Hope you enjoy stirring it up!

Saturday, April 10, 2010

Million Dollar Pie


Crust

* 1 refrigerated Pillsbury® pie crust (from 15-ounce box), softened as directed on box

Filling

* 1/2 cup butter or margarine
* 1/2 cup packed brown sugar
* 3/4 cup corn syrup
* 1/8 teaspoon salt
* 1 teaspoon vanilla
* 3 eggs , lightly beaten
* 4 Nature Valley® Oats 'n Honey crunchy granola bars (2 pouches) crushed. To easily crush granola bars, do not unwrap. Use rolling pin to crush bars.
* 1/2 cup chopped walnuts
* 1/4 cup quick-cooking or old-fashioned oats
* 1/4 cup chocolate chips
* Whipped cream or ice cream , if desired

Directions:

Heat oven to 350°F.

Place piecrust in 9-inch glass pie pan as directed on box for One-Crust Filled Pie.

In large microwavable bowl, microwave butter on high 50 to 60 seconds or until melted.

Stir in brown sugar and corn syrup until blended. Beat in salt, vanilla and eggs.

Stir crushed granola bars, walnuts, oats and chocolate chips into brown sugar mixture. Pour into crust-lined pan.

Bake 40 to 50 minutes or until filling is set and crust is golden brown. During last 15 to 20 minutes of baking, cover crust edge with strips of foil or pie shield to prevent excessive browning.

Cool at least 30 minutes before serving. Serve warm, at room temperature, or chilled with whipped cream or ice cream.

Store in refrigerator.

From whence it came: This recipe won the million dollar prize in the 2004 Pilsbury Bakeoff and I saw it made on Oprah's show way back then and just had to try it.

Why it's blogable: Any pie that wins a million dollars, and this one really did, is blogable! This pie is really really good, and very easy to make. Here's a little secret that it pains me to admit, I'm not a good pie crust maker. Nope, I'm just not. It's something I need to work on. Lucky for me my friend Marie Calendars makes really good frozen pie crusts. That's what I always use when making this recipe. This is a huge favorite of the teen son. He can make this one all by himself, and he has. Sometimes he begs me to make it, and like the great mom I am, I use it as leverage to get him to do just what I want. And it works!

Hope you enjoy stirring it up!